Internet Tools for Teaching
EDIM 514
|
Yes, I did indeed discover many new things this week! I'd like to reiterate how obsessed I am with Quietube and Printliminator! We had some friends over last night (nothing beats a bonfire in the fall!) and I showed them these great shortcuts and they, too, were obsessed! Love the little things that make our jobs just a little easier!
I found Kathy Schrock's Guide to Everything website to be just that...EVERYTHING! I clicked on many of the links and played around with several of the websites, but the two I enjoyed the most were Be Funky and Storyboard. Be Funky is a photo editor that pretty much allows the user to do the same things iPhoto can do and way beyond. As I played around, I found ways to edit the photos by blurring the edges, changing the tone of the photo, rounding the edges, and much more. What I did find especially useful was being able to add graphics, text, overlays, textures, frames and artsy options (I especially liked being able to make my photo look like an oil painting!) I can see my students maximizing their creativity as they truly customize their photos. This may seem like a small celebration, but I really liked the frames, and there was one in particular called "Grunge" that would be perfect to use for our immigration unit. Last year, we used the Green Screen to take pictures of the kids in front of the Statue of Liberty. We made it a sepia filter so they could add the photo to their immigration journal. But I loved that Grunge frame to use because it gives the photo an even older look. It's the little things, really! Beyond just photos though, you can also create collages, invitations, brochures, greeting cards, etc. There really are a ton of options, and many of them are free! Of course, there are custom options that are part of the "plus" plan. I found out that a user can continue to use the site as is for free, pay a monthly fee of about $5 or a yearly fee of about $35. I think if you were someone who was really into customizing photos, brochures, collages, etc., it would be worth the fee, otherwise the free options would fit my needs perfectly. I liked how easy it was so save my photo creation, and once it was on my desktop, I could upload it anywhere...Twitter, Facebook, Kidblog, Seesaw, possibly a QR code, my class website, etc.! My students, and me, are pretty obsessed with the graphic novel format of storytelling, so Storyboard caught my eye immediately. On Kathy Schrock's site, it did indicate the site would work best on Chrome, which I don't normally use but that didn't stop me, and I'm glad it didn't. Once you get to the site, you'll notice that it's not free, which is a bummer, but there is a 14 day free trial. Personally, I don't think this is long enough for a teacher with a class of 26 third graders. It's just not enough time for the kids to really determine whether or not it's a useful tool for the long term. The subscription is about $10 a month or $60 a year. With that said...I loved the site. There are SO many different backgrounds that can be pulled into the frames, and each background can be edited to fit your story. For example, I was playing around with a castle (thinking about our fairy tale unit.) The castle looked great on its own, but then you could change the color of the castle, the flags, make it night time or daytime, snow or rain or sun...the possibilities really did seem endless. Then you could add your characters. There were adults, kids, athletes, monsters, animals, teenagers, and more...and each of those were customizable! It was super easy to add speech bubbles and change the layout of the frames. Such a great resource for storytelling across many different genres and subjects. I was eager to find out how the Storyboard is saved and shared, but I couldn't get that far because they wanted me to create an account, which I did not want to do yet. Since the free trial is only 14 days, I'd like to wait until the very last minute to create an account before sharing with my students. My guess is that it's very easy to save and share since the rest of the site was super easy to use, too. I'm thinking of emailing the developers to ask for an extension of the free trial and/or to encourage them to reconsider the fees for teachers. It's worth a shot! I'd also like to look at the site on my iPad to see if there's a mobile version/site for my students to use on their iPads. The last tool I investigated was Capzles. To be honest, I love the idea of this tool, but I didn't find it as user friendly as the others I discussed above. According to Dembo and Bellow, "Capzles is a refreshingly unique take on timeline creation that goes far beyond what you may have seen previously. Not only is it completely web based but it bakes in a series of enhanced features that make creating and viewing a Capzle both a cool and educationally sound experience" (154). This sounded like something I had to play around with. I was thinking it would be a great resource to trace our learning throughout a unit or school year. In the past, my school used concept maps to connect our learning to an overall theme such as citizenship or leadership. I would take pictures of the students engaged in our lessons and put them on our concept map so students could remember their learning, but I thought Capzles could bring that idea into the 21st century! With all the media project we do throughout the year, I thought this would be a great way to store and share our learning, however, I had some problems using the site. I was able to upload still images without any problems, but I could not get my videos to load. I'm sure it's something I'm doing, but I didn't have time to troubleshoot. I did like all the background options (still images or animated), I could add audio to the Capzles, and the ability to make the Capzles public, private, or viewable by friends. On paper, it seems like the perfect tool, I think I just need more time to explore and play! I think that Be Funky and Storyboard are tools I could really get on board with. I can use them across our curriculum and would really enhance my students' abilities to be creative and unique. Resources By creating an account you agree to our Terms of Use. (2007). Photo Editor | BeFunky: Free Online Photo Editing and Collage Maker. Retrieved September 25, 2016, from https://www.befunky.com/ Capzles Social Storytelling | Online Timeline Maker | Share Photos, Videos, Text, Music and Documents Easily. (2016). Retrieved September 25, 2016, from http://www.capzles.com/# Dembo, S., & Bellow, A. (2013). Untangling the Web: 20 tools to power up your teaching. Thousand Oaks, CA: Corwin: A SAGE Company. Prototypes, L. C. (2016). Storyboard That: The World's Best FREE Online Storyboard Creator. Retrieved September 25, 2016, from https://www.storyboardthat.com/ Schrock, K. (2011, July 10). Online Tools. Retrieved September 25, 2016, from http://www.schrockguide.net/online-tools.html
0 Comments
The shortened URL for my Wilkes blog site is https://goo.gl/yz3SN1. To be honest, I'm not sure if it's that much easier to share than angelawakewilkes.weebly.com. There are less strange characters and to me, the original site just makes more sense. However, I do see how shortening a URL would be helpful, especially for my younger students. Many times, I want them to access a website for research or perhaps some digital media, however, the web address is so long that my third graders inevitably enter something wrong. To solve this problem, I've used QR codes which generally work like a charm, but I like having different options. I'm truly surprised at how easy it was to use bit.ly and goo.gl. I do use QR codes regularly in my classroom and for a variety of reasons. It's a way I post student work on our bulletin board (my students have Seesaw accounts that create QR codes to link directly to their digital portfolio), a way to access a site, check their work in a game of Scoot, and more. One way I've been meaning to use QR codes is in my classroom library. There are SO many great book trailers available to students, but they don't always get the opportunity to view them. As you can see, I took the newest Raina Telgemeier graphic novel (always popular) and made a QR code for a short book trailer. This way, students can use their devices to scan the code, view the trailer on their own time, and determine whether or not it's a book they'd like to read!  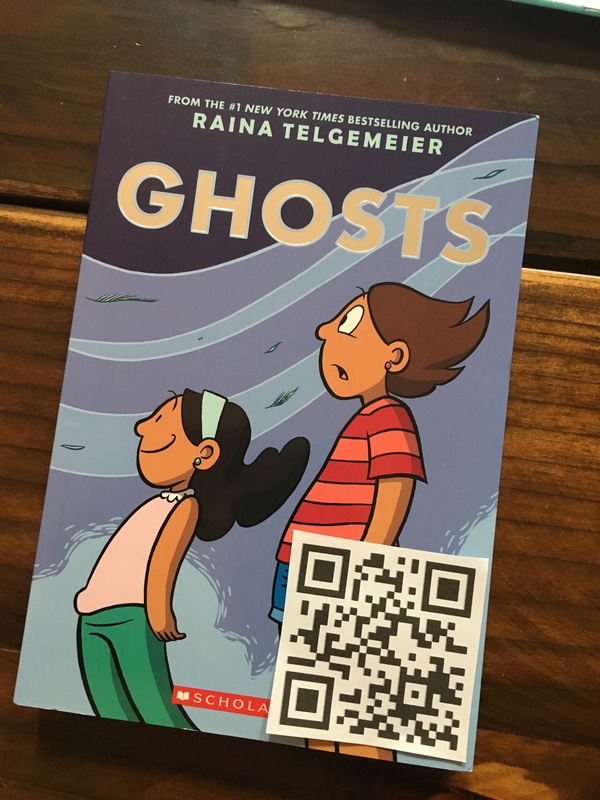 This was the first time I've used Delivr.com and I found it very easy! I typically use qrstuff.com, but I've been on the hunt to find a QR code generator that will create a code for images on my computer. I did find one at www.qr-code-generator.com. It worked out really well and used this generator for many of my beginning of the school year activities. What I did not realize (my own fault) is that I had signed up for a 14 day free trial and to continue to have my codes activated beyond that would be roughly $150 a year. RIGHT? I'm not going to lie, I've seriously contemplated biting the bullet and paying the fee...after all, I spent a LOT of time making those codes, but it's a lot of money for one year! If you know of any other QR code generators that link pictures, I'm all ears!
I was very interested in some of the Bookmarklets listed in this activity, so I played around with the first two and my jaw has pretty much been on the floor ever since! I wasn't quite understanding The Printliminator until I actually viewed the tutorial and...AMAZING! I jumped onto some sites that have so much background noise and in seconds, the noise was gone! I can't believe how easy it was to do, either! I print articles from Newsela or Wonderopolis fairly often and I'm always using white out or physically cutting or pasting pieces together to get rid of the background noise. The Printliminator took care of that problem. As teachers, we want tools that help us save time but not quality, and this tool definitely fits those two criteria! I also tried Quietube, and when I did, I started laughing. I've used SafeShare.tv for many years, but there are multiple steps to generating a new URL and then saving it, etc. Once I found a YouTube video I wanted to watch, all I did was click on the Quietube Bookmarklet, and again, in seconds, I was watching the video without any previews for upcoming videos or advertisements. There's also the option for saving the link for the future, which is really nice, but being able to use it on the spot is extremely beneficial, too! I'm looking forward to sharing some of these tools with my colleagues because I know they'll find them as beneficial as I do! The integration of Web 2.0 tools in the classroom is no longer limited to a simple Google search, and hasn’t been for quite some time. There are an abundance of great tools that lend themselves to social interactions, creativity and the curation of ideas.
We all know learning is social. Students should collaborate, share, cooperate, etc., in many different ways. When I was young, we would do group projects. We’d meet up with people at the local library, use the card catalog to find a resource and make a poster about our research. When technology entered the classroom, I think many people thought the social aspect would be lost. Students would be hyper focused on the computer or hand held device, and face-to-face interactions would be lost. However, there are so many Web 2.0 tools available to teachers that promote students to be social. Twitter is a great resource for educators of all ages. I joined Twitter around this time last year because a reading specialist at my school told me how great it is. I must admit, I’ve been a digital immigrant with Twitter, but I’m getting better. I mostly use Twitter to connect with authors and illustrators for my students. Last year, my students would write authors letters, I’d take a picture of the letter, and we’d Tweet it to the author. Most of the time, authors responded to the student within 24 hours. We also shared special projects, book trailers, class news, etc., through our class Twitter account. I found that the authors that responded to us became the authors the kids wanted to read. I even had a well-known author send me a DM after receiving a digital letter from one of my students. She had a new book coming out and wanted to send my student a signed copy through the mail. These authors truly become rock stars to students. After reading about social networking tools in Untangling the Web, I learned some new ways to incorporate Twitter into our digital lives in school. While my third graders do not study the life cycle, I enjoyed the idea of using Twitter to share newsworthy updates from a curricular standpoint (Dembo & Bellow, 125). In our upcoming Social Studies unit encompassing rights and responsibilities of citizens, I am thinking of ways to report citizenship news from the classroom. We could Tweet when a student exhibits positive examples of citizenship. I’m sure the authors we follow would love seeing children acting responsibly! For me, integrating Web 2.0 tools to enhance student creativity have been the most transformative tools in my classroom. I’m a big fan of all things Google (except Sites…I just can’t get the hang of that one!), Pic Collage, Scratch Jr, Code.org, ChatterKid, StoryKit, Comic Maker, and more. I feel these tools have given my students new and innovative ways to share their creativity, and no two projects are the same! Recently, one of my colleagues started using Glogster regularly with her fourth graders. I’ve dabbled with Glogster for classes through Wilkes in the past, but I have not used it with my students. When talking to my colleague, she indicated that she, too, utilizes all the creative tools I mentioned before, but she has the students use Glogster to collect their creative work and share with one another. She said parents also enjoy seeing the Glogsters after a unit of study, and some even share with family members outside of our community! This is on my “to try” list for this year. The only hesitation I have with using Glogster is the speed in which the site loads. When I tried it earlier this year, it was very slow on my computer and I became frustrated quickly. I’m hoping with my students iPads, it will not run so slowly. Tools that provide curation opportunities are not tools any of my colleagues, or myself, have used with our students. Of course, I’m on Pinterest and use that for a variety of reasons, including collecting education related sites and resources. As I read about eduClipper, I’m adding this to my “to try” list as well. With my students having their own iPads, I’m often adding websites to home screens one at a time, and let me tell you…it takes a while to do that for 26 iPads! By creating a class eduClipper, I can “allow…(my) students to find, collect, and share web content quickly” (Dembo & Bellow, 17). I can see this being a big time saver and useful way for not only me to share with my students, but my students to share with one another. I’d like to follow other educators, or the creators themselves, on Twitter to see eduClipper in action in the classroom. When I look for new Web 2.0 tools to use with my students, I definitely take into consideration the social, creative and curation possibilities. I’m looking forward to more conversations about these tools. Resources Dembo, S., & Bellow, A. (2013). Untangling the Web: 20 tools to power up your teaching. Thousand Oaks, CA: Corwin: A SAGE Company. I was able to connect with a friend who teaches second grade in a neighboring district. While it seems as though her district is not yet fully embracing technology integration in the lower grades, she is ready and willing to implement a variety of technology based resources in her classroom.
At the current time, she finds Internet tools most helpful with writing and research. Currently, she goes to the computer lab to access Google Docs. She found Google Docs to be helpful in collaborating, editing and publishing. She also started using PebbleGo for research. She found this tool to be user friendly with informational text features, audio, and usability. When she is able to get access to the computers on check out carts, she uses them in her classroom to practice math fact fluency with xtramath.org and continued use of Google Docs. It seems as though her decisions to use technology are based mostly on whether or not she can get her hands on the technology. She has a strong desire to introduce more tools to her second graders, but she feels inhibited by her administrators and Information Specialists since she doesn’t feel they care too much about enhancing technology in the younger grades. She feels if she keeps proving it’s a passion of hers and seeks out more opportunities, the powers-that-be will provide her with the resources she needs to move forward. She’s hoping with some recent additions of a technology professional development team in her district, they will also advocate for enriching technology in the younger grades. When I asked her what advice she would give to teachers starting out, she said that one must be patience and have perseverance. She indicated that it can be easy to give up and continue to use more traditional teaching methods, but with her interest and desire to become more 21st century learning centered. As for patience, she feels she not only needs to be patient with her administration, but also with the students. It takes time and patience to facilitate activities that incorporate new Internet tools to ensure the students are using the tool correctly and effectively. I thought it was very interesting to talk to my friend about technology in her district. What I realized is that our district has similar viewpoints: grades 3-8 will be 1:1 in the next 5 years while K-2 will be technology “rich.” I’ve also seen this as a celebration, since I teach third grade! I hadn’t considered how this affects the younger teachers. Many of them seem eager to integrate technology but feel they aren’t supported by the admin. I can see how frustrating it would be as other classrooms are doing some pretty amazing things with technology and you feel your being left in the dark. This makes me think that maybe I should try to find a younger classroom (1st or 2nd grade) to buddy up with and teach them how to use different Internet tools. Not only would this expose the younger kids to useful tools, but it would give my third graders an opportunity to share and be leaders.  Angie Wake's Wilkes University Blog by Angie Wake is licensed under a Creative Commons Attribution-NonCommercial 4.0 International License. Based on a work at http://angelawakewilkes.weebly.com/.
To be completely honest with you, this is the first time I've thought about, or even considered, creating a license for my work. With the amount of information out there and wanting to set a good example to others on how to use the Internet and other people's resources responsibly, I do understand the need to create a license...it's just not something I've done before! I can't say I'm confident that I made the right choices, but I suppose they'll do for now. I chose the option to allow my work to be shared, because let's be honest...that's what teaching is! I know I've used ideas from other educators to inspire my own teaching and I'm very open to sharing, as my ideas aren't necessarily my own to begin with! I chose not to have this blog/ideas used for commercial use because I just didn't think it was necessary. I'm not selling anything, I'm not inventing anything new here, so I just didn't see the value in using this blog commercially.
As we begin a new school year and delve into different projects using media-based resources, this is a great reminder to me that, even on a third grade level, I need to set a good example of giving credit to resources I use through a bibliography, quotes, sharing, etc. |
Angie Wake's Wilkes University Blog by Angie Wake is licensed under a Creative Commons Attribution-NonCommercial 4.0 International License. Based on a work at http://angelawakewilkes.weebly.com/. AuthorAngie Wake - 3rd grade teacher in northern Illinois ArchivesCategories |
 RSS Feed
